This post contains affiliate links. The author may earn a commission from qualifying purchases.
Holy Week is a time to reflect on Jesus’ path to redeem us, starting with His triumphant entry into Jerusalem on Palm Sunday, moving to His Last Supper, betrayal, and arrest on Maundy Thursday, then His suffering and death on Good Friday, and culminating in His glorious Resurrection on Easter Sunday. Here are a few hands-on activities and resources to use at home for teaching children about the important events of Holy Week and to prepare them for Easter.
Make and Use Resurrection Eggs


Resurrection Eggs are a great visual and tactile way for children to learn and remember the events of Holy Week. Each egg contains a small figure to represent a different Holy Week event, ending with an empty egg to represent the empty tomb. Starting 11 days before Easter, open up an egg each day, read the accompanying scripture passage, and discuss it with your child. You can also start Palm Sunday, and open more than one egg per day. Another idea is to have kids pick an egg at random and ask them how the symbol inside fits with the Holy Week story. My family was gifted the set pictured above, but it would be easy to make your own set as well! You can use materials from around the house, or print off small clip-art pictures to put in the eggs.
You will need 12 plastic Easter eggs. Number them 1-12, and fill them with the following items/pictures and Scripture passages:
Egg 1: Donkey and/or palm branches: To represent Jesus’ Triumphant entry on Palm Sunday. Scripture: Matthew 21:1-11 or Mark 11:1-10
Egg 2: Coins: To represent the silver that Judas betrayed Jesus for. Scripture: Matthew 26:14-16
Egg 3: Cup/Bread: To represent Jesus’ Last Supper, and the institution of the Lord’s Supper. Scripture: Matthew 26:26-29
Egg 4: Praying Hands: To represent Jesus praying in the Garden of Gethsemane. Scripture: Matthew 26:36-46
Egg 5: Rooster: To represent Peter’s denial of Jesus. Scripture: Matthew 26:30-35, 69-75
Egg 6: Whip/small piece of leather: To represent the beating and humiliation of Jesus. Scripture: Matthew 27:15-25
Egg 7: Crown of thorns and purple cloth: To represent the thorny crown and robes placed on Jesus to mock Him. Scripture: Matthew 27:27-31
Egg 8: Nails/Cross: To represent the Crucifixion. Scripture: Matthew 27:32-54
Egg 9: Spear: To represent the soldiers piercing Christ’s side after His death. Scripture: John 19:31-37
Egg 10: A white cloth: To represent the linen shroud Jesus’ body was wrapped in. Scripture: Matthew 27:57-59
Egg 11: A stone: To represent the stone rolled in front of Jesus’ tomb. Scripture: Matthew 27:60
Egg 12: Nothing!: The empty egg represents the empty tomb Easter morning. Scripture: Luke 24:1-12 or Matthew 28:1-10
If you’d rather purchase a set instead of making one, you can buy the Family Life Resurrection Egg set here. We love ours!

Make Handprint Palm Branches

Make palms with your palms for Palm Sunday!
Materials:
- 2 Popsicle sticks
- Pencil
- Scissors
- Green construction paper
- Tape or glue
Instructions: Tape two popsicle sticks together (end to end) to make the stem for your palm branch. Trace your child’s hand prints on green construction paper and cut them out. You will need 6-7 hand print cut outs for this project. Using tape or glue (we used some double stick tape with regular tape for reinforcements, because my kids can’t wait for glue to dry), secure your handprint fronds to the popsicle stick stem.
Build a Resurrection Garden


A beautiful visual reminder of the Resurrection for kids and adults alike, and a great table centerpiece for the Easter season!
You will need:
- A large plant saucer (the kind you use to set pots in for draining)
- A miniature terra cotta pot
- Potting soil
- A rock large enough to cover the mouth of the mini pot
- Small stones to make a path
- 3 Miniature crosses (We made ours with twigs and hot glue)
- Grass seed and/or moss
- Optional: Small plants/flowers (real or artificial) to decorate your garden
Instructions: Set the miniature terra cotta pot on its side inside the saucer. This will be the “tomb.” Carefully add potting soil to the dish, heaping it over top of the miniature pot. Set the larger stone to the side of the pot’s opening, and use the smaller stones to make a path. Arrange the three miniature crosses on top of the mound over the miniature pot (you may need to use small stones to prop them in place. Sticky tack or clay would also help). Sprinkle grass seed over the top of the soil, mist with water, and pray that the grass grows in by Easter. You can also use moss to cover the soil if you don’t want to wait for grass to grow! Add any extra plants you wish to fill out your garden.
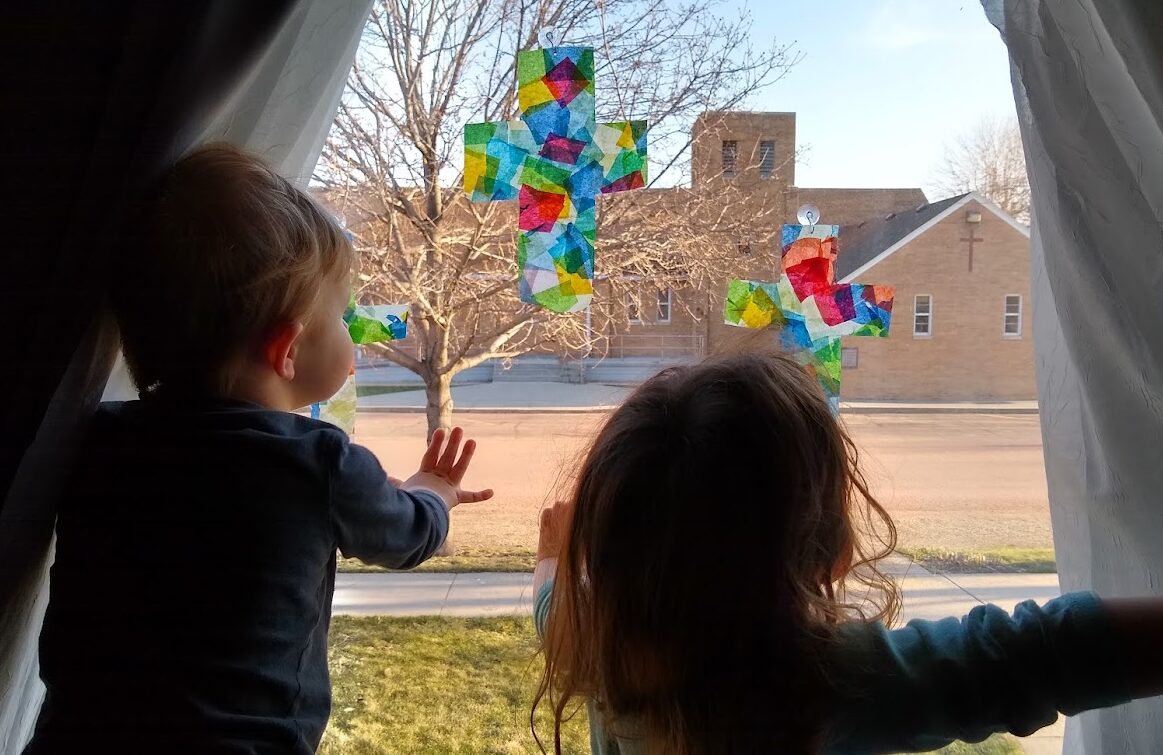
Make Tissue Paper Stained Glass Windows


Transform your home into a reverent space for Holy Week with some simple “stained glass” windows.
You will need:
- Black construction paper
- Tissue paper in different colors, cut into small pieces
- Contact paper
- Scissors
Instructions: Cut a window in the center of a piece of black construction paper. Using the scraps, cut a small cross out of the black construction paper. Unroll the contact paper and cut a rectangle large enough to cover the center of your “window.” Peel off the backing of the contact paper and place it sticky side up on your workspace (this will be frustrating. That stuff rolls up like crazy). Carefully place your black paper window on top of the contact paper, and place your cross in the center of your window. Have your child stick bits of tissue paper to the contact paper to fill in the space around the cross. Once all sticky parts have been filled in with tissue paper, flip the window over and check out the finished project! Hang it up in a sunny window to admire.
Make a 3-D Paper Plate Resurrection Scene

Here is a fun Resurrection scene for older kids to make and display, that is significantly less messy than the Resurrection garden. For younger kids, I’d make a two dimensional version on paper, without the plate.
You will need:
- 1 paper plate
- Construction paper (green, brown, gray, white)
- Markers
- Scissors
- Glue
Instructions: Fold your paper plate in half. Trace half the plate on green construction paper to make grass, and half on gray paper (we didn’t have any and had to color ours) to make the tomb. Cut out your half circles. You can cut your gray paper half circle in a wavy line to make it more “tomb like.” Draw a door for the tomb on the gray half circle and cut it out. Draw a rock on gray paper big enough to cover the door of the “tomb.” You can also draw and cut out a bench and white linen to paste in the tomb, and a fringed strip of green paper to make grass. To make a path, rip up bits of brown and gray paper. Finally, use brown paper to make three small crosses.
To assemble, glue down the green half circle to the bottom half of the plate. Then, glue the stone table and linen (if using) to the top half of the plate, so that it will show through the tomb’s door. Glue your gray half circle to the top half of the plate, over top of the stone table and linen. Fold back about a quarter inch strip of the bottom of your paper stone. Add glue to the strip, and stick your rock to the side of the tomb’s door. Repeat with your “grass” if using. Glue down your path of ripped bits of paper leading to the tomb. Glue the three crosses to the top of the tomb.
Bake Resurrection Rolls

Your Resurrection Rolls won’t look like the stock photo above. I forgot to photograph ours last year. Whoops! Pictures aside, Resurrection rolls are a great baking activity to do with your kids on Holy Saturday. Prepare them Saturday, and eat them with breakfast Easter Sunday for a wonderful surprise!
Ingredients:
- 1 can of Pillsbury crescent dough
- 8 Marshmallows
- A small bowl of water
- Cinnamon sugar mixture
Instructions:
- Preheat your oven to 375 degrees. Spray a baking sheet with nonstick spray
- Read John 19:38-40 to your children
- Open your crescent dough and separate it into 8 strips. Explain to your children that the dough is like the strips of linen that Jesus’ body was wrapped in for burial.
- Take your marshmallows, dip them in water, and roll them in the cinnamon and sugar mixture. Explain to your children that the marshmallow represents Jesus’ body. The water represents the oil His body was anointed with. The cinnamon mixture represent the spices that they wrapped Him with.
- Wrap each marshmallow in a strip of crescent dough, making sure to pinch the seams shut.
- Place your rolls on the prepared baking sheet, and bake for 8-10 minutes until they are golden brown.
- Allow to cool. If you can wait, eat them Easter Sunday. When the children bite into the rolls, they will find that the marshmallow is gone, and that the rolls are empty inside! Read the account of the Resurrection. Remind them that on Easter Sunday, Jesus’ tomb was also empty! Christ has risen!
The Most Important Activity….

GO TO CHURCH! There is no better way for children to hear and learn about Christ’s journey to the cross than to attend the many beautiful worship services that happen throughout Holy Week. Yes, the services clash with bedtime. Yes, there are a lot of them. Yes, your child may shout “Turn the lights back on!” at the Tenebrae service. But hearing the account of how God defeated sin, death, and the devil in all of its somberness, surrounded by fellow sinners in need of grace, is a far more meaningful way to impress upon children the importance of Holy Week and the glory of Easter than any craft project or plastic egg.
Do you have a favorite activity to do with your children during Holy Week? Let me know in the comments!